Sony Movie Studio Making Pictures
Matt Bird writes all sorts of nonsense, but he enjoys writing animation tutorials for Unity.
Though a lot of videos can get by without any effects-based embellishment, there are times when you're going to have to bring extra elements into the mix. One of the most common of these elements is the static image. Images pop up all the time in some of the more popular videos on YouTube and other streaming sites, and so knowing how to use them in your own videos—whether you do so often or not—can be rather handy.
In this article we'll cover inserting images into your Vegas Movie Studio project. It's a simple enough matter to get an image into your video wholesale, but it's a little trickier to insert something that's at least partially transparent. That's exactly what you'll want most of the time, as well, since images surrounded by a white background look incredibly ugly, and will cover up huge portions of your video.
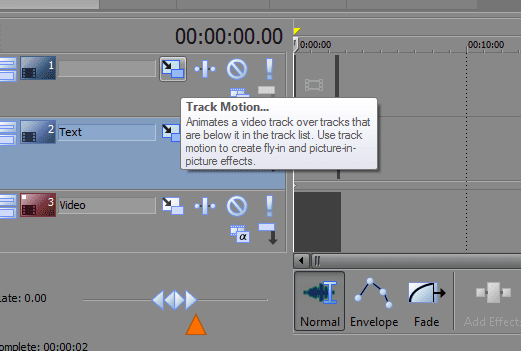
The 'Track Motion' button in Sony Movie Studio Platinum.
Inserting an Image
As mentioned, simply inserting an image into Vegas is pretty easy:
- Locate the image on your computer.
- Either click and drag the image onto your timeline from your desktop/opened folder or locate it using Vegas' 'Explorer' tab, on the left side of the screen.
- Stretch or shorten the image on the timeline as you would any other clip.
It's that simple. Bear in mind, though, that unlike elements created in Vegas, you can't simply click on the image in the preview window and move it around if you want to change its location and/or resize it. To do this, you must instead click on the 'Track Motion' button (pictured above) and shift/resize the image in the window that appears. This will change everything on that track by the same degree, so you'll want to give the image its own track.
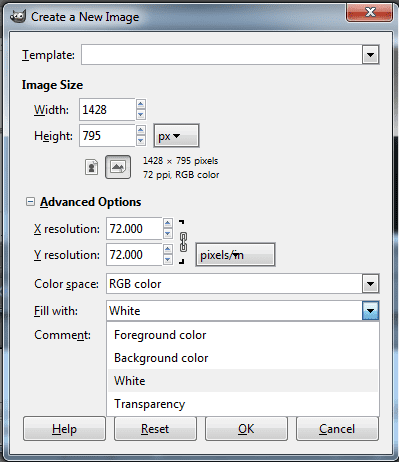
Creating a new canvas in GIMP, with the settings needed for a transparent background.
Inserting an Image With a Transparent Background
Unless you intend to insert a complete picture, background and all, you'll probably want some degree of transparency involved. A good example of this would be snipping someone out of a picture in Photoshop, dropping the snipped person into their own file, and using the solo figure as you please. It's possible to maintain the resulting transparent background in Vegas, but you have to do a bit of extra prep.
Inserting an image with built-in transparency is functionally identical to inserting any other picture, but only insofar as Vegas itself is concerned. If you just drop any old picture into Vegas it will probably have a white background surrounding the figure that will show up in your preview window and ruin your video in general. You'll need to take extra steps outside Vegas to get the transparent background you want:
- Open the picture you want to use in an image editor, such as Photoshop or GIMP.
- Assuming you haven't already, cut out the picture you want to use and paste it onto a new canvas with no background (it should appear as a field of light and dark grey squares). This can be achieved via the settings when creating a new canvas (see the image above for doing this in GIMP).
- Export the file as a .gif. Make sure to tick any boxes that might ask if you wish to preserve the file's transparency, should they appear (they don't in my version of GIMP, as of this writing).
- Pull the .gif into Vegas the same way you would any other image.
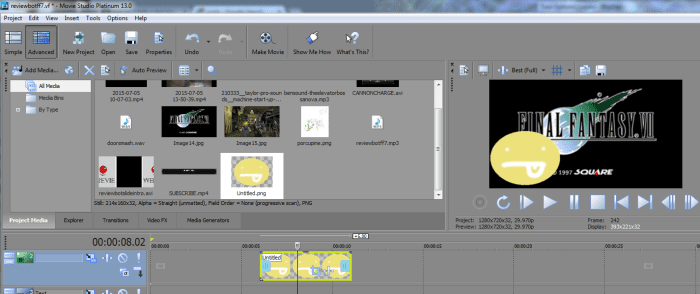
An image with a transparent background that has been pulled into Sony Movie Studio Platinum. (Also, Final Fantasy VII.)
If it worked correctly, your image will appear with the transparency background (grey boxes) in the explorer, and will overlap the rest of your video without generating a white background.
It's worth noting that transparency only seems to be guaranteed with .gifs. .pngs are meant to preserve transparency in the same way as .gifs, and usually come out looking better after being exported, but for some reason Vegas doesn't always acknowledge transparency in .pngs. Occasionally it works, occasionally it doesn't. Exporting images typically takes very little time, so feel free to try both file formats to see if .png will work. If it doesn't, go with .gif.
One final tip! If you have a 'transparent' background that's still showing up as a black or white border, there's one other thing you can try. Right click on your image on the timeline and choose 'Properties', at the bottom of the menu. Click the 'Media' tab at the top of the resulting menu, then look for 'Alpha Channel' near the bottom of the 'Media' menu. Change whatever setting is there to 'Premultiplied'. This may remove the background. If it doesn't, you'll probably have to go back and export your image again with different settings.
This article is accurate and true to the best of the author's knowledge. Content is for informational or entertainment purposes only and does not substitute for personal counsel or professional advice in business, financial, legal, or technical matters.
sb jobayer on August 26, 2018:
helpfull post
Sony Movie Studio Making Pictures
Source: https://turbofuture.com/graphic-design-video/How-to-create-images-with-transparent-backgrounds-in-Sony-Vegas-Movie-Studio